Hit Enter or
TAGS:  unity3d (9)  art (6)  experience (4)  hci (4)  virtual-reality (4)  vr (4)  ar (3)  computer-human-interaction (3)  digital-art (3)  generative (3)  installation (3)  interactive (3)  augmented-reality (2)  business-activation (2)  graphics (2)  math (2)  p5js (2)  research (2)  shaders (2)  tangible-interfaces (2)  algorithm (1)  app (1)  architecture (1)  arduino (1)  c# (1)  design (1)  iot (1)  maths (1)  mesh (1)  nft (1)  serial (1)  snapchat (1)  tools (1)  tutorial (1)  visualization (1)  work (1) 

Show system temperature on a mini i2c (9E6018A0) screen via Arduino Nano
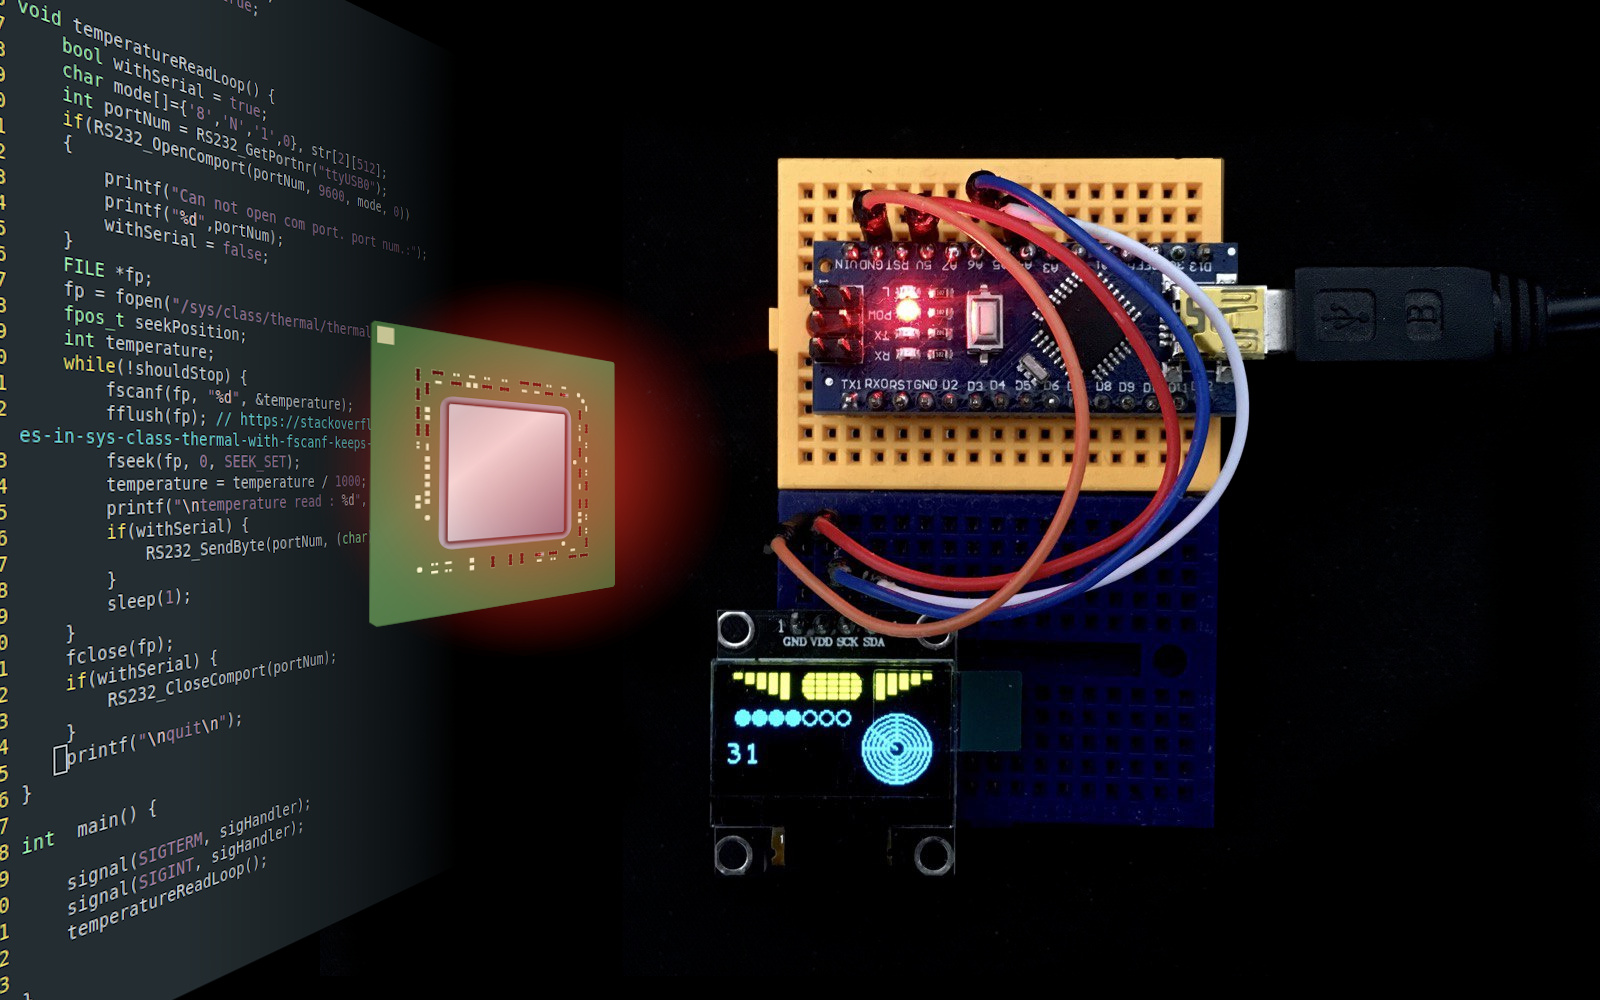
Table Of Contents

Introduction

This is a project showing

  • How to wire the I2C display to an Arduino
  • How to retrieve the CPU temperature (or other values) from Linux’s sysfs
  • How to use the RS232 library by wjwwood
  • How to connect to the Arduino Nano and send data
  • How to receive data in Arduino
  • How to display data through the nice graphics library by Adafruit —— (also how to scribble with that library)

We will build a minimal C++ console application that retrieves a temperature value from Linux’s sysfs and sends it to a serial port. Then we will see how to wire the I2C screen to an Arduino Nano where we’ll upload our own sketch that reads the incoming value from the serial stream and renders it, with the help of some Adafruit’s libraries, to the 9E6018A0 screen. Moreover we will fill the screen with useless but cool looking graphics.

Requirements

  • A Linux system
  • Arduino Nano
  • I2C Display 9E6018A0 *
  • 4 wires
  • USB cable
  • Breadboard

*: Can be sourced at AliExpress but many other screens are compatible with the Adafruit library, including excellent Adafruit ones.

Prerequired Knowledge

  • Basic C++
  • Arduino programming
  • A sprout of confidence with Linux

Part 1: retrieving system information

sysfs

The principle behind retrieving hardware information is extremely simple in Linux where, in case you haven’t been told enough already, everything is a file. Even the CPU temperature or the system fan’s speed.

From Wikipedia: sysfs is a pseudo file system provided by the Linux kernel that exports information about various kernel subsystems, hardware devices, and associated device drivers from the kernel’s device model to user space through virtual files.[1] In addition to providing information about various devices and kernel subsystems, exported virtual files are also used for their configuration.

Interesting locations to find such informative files are /proc and /sys/class/. If you take a moment to explore these directory trees, you should have at least an intuition on what information each file contains and what device they refer to. Of course you’ll find some cryptic naming but in general, you should have a grasp on how it works.

For example /sys/class/thermal/thermal_zone0/temp is the 1st CPU’s current temperature. Simply using cat, we can print the file’s contents and thus get one read of the current CPU temperature.

cat /sys/class/thermal/thermal_zone0/temp

If we want a recurrent reading, the command watch can be of great help.

watch cat /sys/class/thermal/thermal_zone0/temp

Note: watch will also be extremely useful later to quickly find out if our program is printing out the correct values.

Reading files in C++

Opening a file for reading

1
2
FILE *fp; // file pointer or file descriptor
fp = fopen("/sys/class/thermal/thermal\_zone0/temp", "r"); // open in read mode

Reading a value from a file

1
2
float temperature;
fscanf(fp, "%d", &temperature);

Resetting the reading to the start of the file

1
2
fflush(fp); // always flush after reading and before setting the seek
fseek(fp, 0, SEEK_SET);

Part 2: Temperature reading and serial communication in C++

RS232 library

There’s many serial libraries around and many of them are good. The one developed by GitHub’s user wjwwood seems to be one of the most widely adopted.

Opening a serial port

In the following example I use the ttyUSB0 port but your serial device might be connected to a different one. To find out which is the right one these commands can be useful:

lsusb
ls /dev/tty*
1
2
3
4
5
6
7
char mode[]={'8','N','1',0}, str[2][512];
int portNum = RS232_GetPortnr("ttyUSB0");
if(RS232_OpenComport(portNum, 9600, mode, 0))
{
        printf("Can not open comport\n");
        withSerial = false;
}

Sending a byte to serial device

1
RS232_SendByte(portNum, (char)(temperature));

And that’s all we need for now.

C++ full code

 1
 2
 3
 4
 5
 6
 7
 8
 9
10
11
12
13
14
15
16
17
18
19
20
21
22
23
24
25
26
27
28
29
30
31
32
33
34
35
36
37
38
39
40
41
42
43
44
45
46
47
48
49
50
51
52
53
54
55
56
57
#include <stdio.h>
#include <sys/types.h>
#include <unistd.h>
#include <signal.h>
#include "rs232.h"

bool shouldStop = false;

void sigHandler(int signo) {
	if(signo == SIGTERM) {
		shouldStop = true;
	}
	else if(signo == SIGINT) {
		printf("\nBye bye");
		shouldStop = true;
	}
}

void temperatureReadLoop() {
	bool withSerial = true;
	char mode[]={'8','N','1',0}, str[2][512];
	int portNum = RS232_GetPortnr("ttyUSB0");
	if(RS232_OpenComport(portNum, 9600, mode, 0))
	{
		printf("Can not open com port. port num.:");
		printf("%d",portNum);
		withSerial = false;
	}
	FILE *fp;
	fp = fopen("/sys/class/thermal/thermal_zone0/temp", "r");
	fpos_t seekPosition;
	int temperature;
	while(!shouldStop) {
		fscanf(fp, "%d", &temperature);
		fflush(fp); // https://stackoverflow.com/questions/65002876/reading-temperature-from-files-in-sys-class-thermal-with-fscanf-keeps-returnin
		fseek(fp, 0, SEEK_SET);
		temperature = temperature / 1000;
		printf("\ntemperature read : %d", temperature);
		if(withSerial) {
			RS232_SendByte(portNum, (char)(temperature));
		}
		sleep(1);
	}
	fclose(fp);
	if(withSerial) {
		RS232_CloseComport(portNum);
	}
	printf("\nquit\n");
}

int  main() {

	signal(SIGTERM, sigHandler);
	signal(SIGINT, sigHandler);
	temperatureReadLoop();

}

Building the C++ application

To build you need g++ and optinally make

Build with the following command

g++ SerialDisplaySysInfo.cpp rs232.c -o SerialDisplaySysInfo

where SerialDisplaySysInfo.cpp is the main file containing the code above.

or create the following makefile

1
2
3
4
CC=g++

SerialDisplaySysInfo: SerialDisplaySysInfo.cpp rs232.c
	$(CC) $(CFLAGS) $@.cpp rs232.c $(LDFLAGS) -o $@

and launch make.

The rs232.h and .c must be in the same folder as the SerialDisplaySysInfo.cpp.

Part 3: Wiring Screen to Arduino Nano

Remember: i2c standard pins, SDK (aka SDL) and SDA are respectively on A5 (clock) and A4 (data)

Wiring Pins

Screen Nano
GND GND
VDD 5V
SDK A5
SDA A4

Part 4: Adafruit graphics library

These Adafruit libraries for Arduino do a lot of magic for us. They hide all technicalities letting us skip the technical documentation while leaving us with an elegant set of functions to easily draw graphic elements on screen.

SSD1306’s (very) technical documentation by Adafruit

Include files and initialization

At the start of our Arduino sketch:

1
2
#include <Adafruit_GFX.h>  // Include core graphics library for the display (OPTIONAL)
#include <Adafruit_SSD1306.h>  // Include Adafruit_SSD1306 library to drive the display

In this article we don’t use the GFX core library.

To initialize our library we create a display object:

1
Adafruit_SSD1306 display(128, 64);  // Create display

In the setup function:

1
2
3
4
5
6
display.begin(SSD1306_SWITCHCAPVCC, 0x3C);  // Initialize display with the I2C address of 0x3C
display.clearDisplay();  // Clear
display.setTextColor(WHITE);  // Set text colour
display.setRotation(0);  // Set orientation. Possible values are 0, 1, 2 or 3
display.setTextWrap(false); // no text wrap
display.dim(0);  //Set brightness (0 is max and 1 is a little dim)

We can now use the functions to draw on the screen. For example:

1
display.fillRoundRect(46, 0, 35, 15, 5, WHITE);

and then there’s drawLine, drawCircle, fillCircle, setFont to change the current text font, println to write text, and on and on. Exploring the Adafruit_SSD1306.h file will give you a good overview of all available methods.

Part 5: Arduino Coding

Finding the i2c address

The Arduino IDE, as you know comes with a big set of examples and a few of them do serve an actually useful purpose.

To find the I2C address of an I2C device that’s connected to the Arduino we can use a very handy I2C scanner that can be found in File > Examples > Wire > i2c_scanner

If you upload this sketch to the Arduino and let it run from a serial terminal, assuming all is wired correctly, you’ll see the addresses of all I2C connected devices.

Arduino full sketch

The following example should work on all SSD1306 screens. It would have to be adapted for screens with different resolutions.

The code is a merge of examples I found online and code I did for this tutorial. Part of the code is made by InterlinkKnight. You can find more of his stuff in his website.

I intentionally left a lot of commented out calls so one can have more handy examples to play with.

  1
  2
  3
  4
  5
  6
  7
  8
  9
 10
 11
 12
 13
 14
 15
 16
 17
 18
 19
 20
 21
 22
 23
 24
 25
 26
 27
 28
 29
 30
 31
 32
 33
 34
 35
 36
 37
 38
 39
 40
 41
 42
 43
 44
 45
 46
 47
 48
 49
 50
 51
 52
 53
 54
 55
 56
 57
 58
 59
 60
 61
 62
 63
 64
 65
 66
 67
 68
 69
 70
 71
 72
 73
 74
 75
 76
 77
 78
 79
 80
 81
 82
 83
 84
 85
 86
 87
 88
 89
 90
 91
 92
 93
 94
 95
 96
 97
 98
 99
100
101
102
103
104
105
106
107
108
109
110
111
112
113
114
115
116
117
118
119
120
121
122
123
124
125
126
127
128
129
130
131
132
133
134
135
136
137
138
139
140
141
142
143
144
145
146
147
148
149
150
151
152
153
154
155
156
157
158
159
160
161
162
163
164
165
166
167
168
169
170
171
172
173
174
175
176
177
178
179
/*

Pins:
 * GND = GND
 * VCC = 5V
 * SCL = A5
 * SDA = A4

You can connect VCC to 3.3V to reduce the amount of high pitched noise that the display produces.

It's a good idea to put a resistor between A4-5V and A5-5V to help stabilize the connection.
What that does is pull-up the I2C pins to make it more reliable and prevents lock-ups.


List of fonts: https://learn.adafruit.com/adafruit-gfx-graphics-library/using-fonts

List of fonts that support right alignment:
FreeMono9pt7b.h
FreeMono12pt7b.h
FreeMono18pt7b.h
FreeMono24pt7b.h
FreeMonoBold9pt7b.h
FreeMonoBold12pt7b.h
FreeMonoBold18pt7b.h
FreeMonoBold24pt7b.h
FreeMonoBoldOblique9pt7b.h
FreeMonoBoldOblique12pt7b.h
FreeMonoBoldOblique18pt7b.h
FreeMonoBoldOblique24pt7b.h
FreeMonoOblique9pt7b.h  
FreeMonoOblique12pt7b.h
FreeMonoOblique18pt7b.h
FreeMonoOblique24pt7b.h
*/

#include <Adafruit_GFX.h>  // Include core graphics library for the display
#include <Adafruit_SSD1306.h>  // Include Adafruit_SSD1306 library to drive the display

#include <Fonts/FreeMonoBold12pt7b.h>  // Add a custom font
#include <Fonts/FreeMono9pt7b.h>  // Add a custom font

#define PI 3.1415926535897932384626433832795
#define HALF_PI 1.5707963267948966192313216916398
#define TWO_PI 6.283185307179586476925286766559
#define DEG_TO_RAD 0.017453292519943295769236907684886
#define RAD_TO_DEG 57.295779513082320876798154814105
#define INV_TWO_PI 0.15915494309189533576888376337251

int counter;  // Create a variable to have something dynamic to show on the display

int serialRead = 0;

void setup()  // Start of setup
{                
  delay(100);  // This delay is needed to let the display to initialize
  display.begin(SSD1306_SWITCHCAPVCC, 0x3C);  // Initialize display with the I2C address of 0x3C
  display.clearDisplay();  // Clear the buffer
  display.setTextColor(WHITE);  // Set color of the text
  display.setRotation(0);  // Set orientation. Goes from 0, 1, 2 or 3
  display.setTextWrap(false);  // By default, long lines of text are set to automatically “wrap” back to the leftmost column.
                               // To override this behavior (so text will run off the right side of the display - useful for
                               // scrolling marquee effects), use setTextWrap(false). The normal wrapping behavior is restored
                               // with setTextWrap(true).
  display.dim(0);  //Set brightness (0 is maximun and 1 is a little dim)

  Serial.begin(9600);
}  // End of setup


void loop()  // Start of loop
{
  int serialReadTmp = Serial.read();
  if(serialReadTmp != -1)
    serialRead = serialReadTmp;
  
  counter++;  // Increase variable by 1
  if(counter > 360)  // If counter is greater than 150
  {
    counter = 0;  // Set counter to 0
  }

  // Convert counter into a string, so we can change the text alignment to the right:
  // It can be also used to add or remove decimal numbers.
  char string[10];  // Create a character array of 10 characters
  // Convert float to a string:
  dtostrf(counter, 3, 0, string);  // (<variable>,<amount of digits we are going to use>,<amount of decimal digits>,<string name>)

  display.clearDisplay();  // Clear the display so we can refresh

  display.setFont(&FreeMono9pt7b);  // Set a custom font
  display.setTextSize(0);  // Set text size. We are using a custom font so you should always use the text size of 0

//  // Print text:
  display.setCursor(0, 50);  // (x,y)
  //display.println("@rstecca");  // Text or value to print
  display.println(serialRead);
//
//  // Draw triangle:
//  display.drawTriangle(40,40,   50,20,   60,40, WHITE);  // Draw triangle. X, Y coordinates for three corner points defining the triangle, followed by a color
//
//  // Draw filled triangle:
//  display.fillTriangle(0,63,   15,45,   30,63, WHITE);  // Draw filled triangle. X, Y coordinates for three corner points defining the triangle, followed by a color
//
//  // Draw line:
//  display.drawLine(40, 63, 70, 63, WHITE);  // Draw line (x0,y0,x1,y1,color)
//
//  // Draw circle:
//  display.drawCircle(47, 36, 20, WHITE);  //  Draw circle (x,y,radius,color). X and Y are the coordinates for the center point

  // Draw a filled circle:
//  display.fillCircle(12, 27, 10, WHITE);  // Draw filled circle (x,y,radius,color). X and Y are the coordinates for the center point

// // Draw rounded rectangle and fill:
//  display.fillRoundRect(58, 0, 18, 18, 5, WHITE);  // Draw filled rounded rectangle (x,y,width,height,color)
//                                                   // It draws from the location to down-right
  // Draw rectangle:
//  display.drawRoundRect(79, 0, 49, 27, 3, WHITE);  // Draw rectangle (x,y,width,height,color)
//                                           // It draws from the location to down-right
   
  display.setFont(&FreeMonoBold12pt7b);  // Set a custom font
  
  // Print variable with left alignment:
//  display.setCursor(83, 20);  // (x,y)
//  display.println(counter);  // Text or value to print

//  // Draw rounded rectangle:
//  display.drawRoundRect(79, 37, 49, 27, 8, WHITE);  // Draw rounded rectangle (x,y,width,height,radius,color)
//                                                    // It draws from the location to down-right
//  // Print variable with right alignment:
//  display.setCursor(83, 57);  // (x,y)
//  display.println(string);  // Text or value to print

  for(int i=0; i<5; i++) {
    display.fillRect(5 + i*7, 0, 5, 3 + i*3, WHITE);
  }
  display.fillRoundRect(46, 0, 35, 15, 5, WHITE);  // Draw filled rounded rectangle (x,y,width,height,color)
                                                 // It draws from the location to down-right

  int gridX = 46, gridY = 3;
  int gridXstep = 7, gridYstep = 4;
  for(int i=0; i<3; i++) {
    display.drawLine(gridX,gridY+i*gridYstep, gridX+35,gridY+i*gridYstep, BLACK);
  }
  for(int i=1; i<=4; i++) {
    display.drawLine(gridX+i*gridXstep,0, gridX+i*gridXstep,gridY+20, BLACK);
  }
    
  for(int i=0; i<5; i++) {
    display.fillRect(90 + i*7, 0, 5, 3 + (4-i)*3, WHITE);
  }

  int ballsCount = 7;
  for(int i=0; i<ballsCount; i++) {
    display.drawCircle(10 + i*10, 24, 4, WHITE);
    int threshold = (int)((ballsCount+1)*((float)counter/360.0));
    if(i<threshold) display.fillCircle(10 + i*10, 24, 3, WHITE);
  }

  int radarCenterX = 102, radarCenterY = 42, radarInnerRadius = 5, radarCircles = 6, radarCirclesDistance = 3;
  for(int i=0; i < radarCircles; i++) { // RADAR CIRCLES
    display.drawCircle(radarCenterX,radarCenterY,radarInnerRadius+i*radarCirclesDistance,WHITE);
  }
  // RADAR LINES
  display.drawLine(radarCenterX-radarInnerRadius, radarCenterY, radarCenterX-radarInnerRadius-(radarCircles-1)*radarCirclesDistance, radarCenterY, WHITE);
  display.drawLine(radarCenterX+radarInnerRadius, radarCenterY, radarCenterX+radarInnerRadius+(radarCircles-1)*radarCirclesDistance, radarCenterY, WHITE);
  display.drawLine(radarCenterX, radarCenterY-radarInnerRadius, radarCenterX, radarCenterY-radarInnerRadius-(radarCircles-1)*radarCirclesDistance, WHITE);
  display.drawLine(radarCenterX, radarCenterY+radarInnerRadius, radarCenterX, radarCenterY+radarInnerRadius+(radarCircles-1)*radarCirclesDistance, WHITE);

  // RADAR SONAR LINE
  float angle = (float)counter;
  int radarLineLength = radarCircles * radarCirclesDistance;
  int aX = (int)floor(cos(angle*DEG_TO_RAD)*radarLineLength);
  int aY = (int)floor(sin(angle*DEG_TO_RAD)*radarLineLength);
  display.drawLine(radarCenterX, radarCenterY, radarCenterX+aX, radarCenterY+aY, WHITE);


  display.display();  // Print everything we set previously

}  // End of loop

Conclusions

We took a good little journey touching the different areas that this kind of prototyping requires: serial communication between a C++ application and an Arduino including the use of Adafruit libraries to obtain some cool graphics on such a cool little, cheap screen such as the 9E6018A0. We used it to show the current temperature of one of the CPU cores. Much more can be done with different values coming from your Linux system and sensors. I hope you felt at least as satisfied as I was in putting this simple project together and I wish you to be inspired to do more.

Please, if you want to show appreciation or found something that should be improved in the article, have your say using the Contact form.

Of course if you’d like to share this article with your communities, more good wishes to you!

Thanks for reading.


Further reading


Troubleshooting

Cannot open serial port / Permission denied

By default, if you try non-root access to any device in /dev, you’ll be denied permission. That’s because by default, non-root users are not part of the dialout group. dialout is the group that allows access to modems and all serial interfaces. The solution is to add your current user to the group.

sudo usermod -a -G dialout $USER

Restart the system.

See also: https://askubuntu.com/questions/133235/how-do-i-allow-non-root-access-to-ttyusb0

Share this page: